Upgrading to a newer Q-net Pro 7 release
Upgrading Q-net Pro 7 is simple: run the installer of the new version, or replace the qnet7.jar file. However, always create a full backup before the upgrade.
A new version may contain changes in the database structure or in the configuration files, and the new version converts your data on the first start. If something goes wrong after the upgrade (for example because of a software error in the new version), the only safe way back to the previous, working state is a backup that was created before the upgrade, with the old version.
Without a backup created before the upgrade, it may not be possible to return to the previous version. Simply reinstalling the old version does not restore the data and settings that the new version has already modified.
Before the upgrade
1. Read the changelog
Check the changelog of the new version and of every version between your current and the new one. Pay special attention to the Upgrade note sections, they may contain extra steps required for the upgrade.
2. Upgrade the UAT system first
If you have a UAT (test) environment, always upgrade the UAT system first, following the same steps as described on this page (backup included). Test the new version there with your own settings and the most important use cases. Upgrade the production system only if everything worked properly on the UAT system.
3. Plan the time of the backup and the upgrade
Perform both the backup and the upgrade outside of working hours, when no customers are served:
- While the backup is running, no write operations can be performed in the application (for example, tickets cannot be issued or called, and settings cannot be saved). A full backup with events, statistics and media files may take a long time on a larger database.
- During the upgrade the service is stopped, and the first start of the new version may take longer than usual.
4. Create a full backup
Create the backup with the built-in Backup / Restore function, while the old version is still running:
- Log in to the administration page and open Backup & restore in the Central view.
- Click Create backup.
- In the dialog select every option:
- Include configurations (always included)
- Include events
- Include statistics
- Include media files
- Include server configurations
- Click OK and wait until the backup is finished. Depending on the database size, it may take some time.
- Check that the new backup appears in the Available backups list.
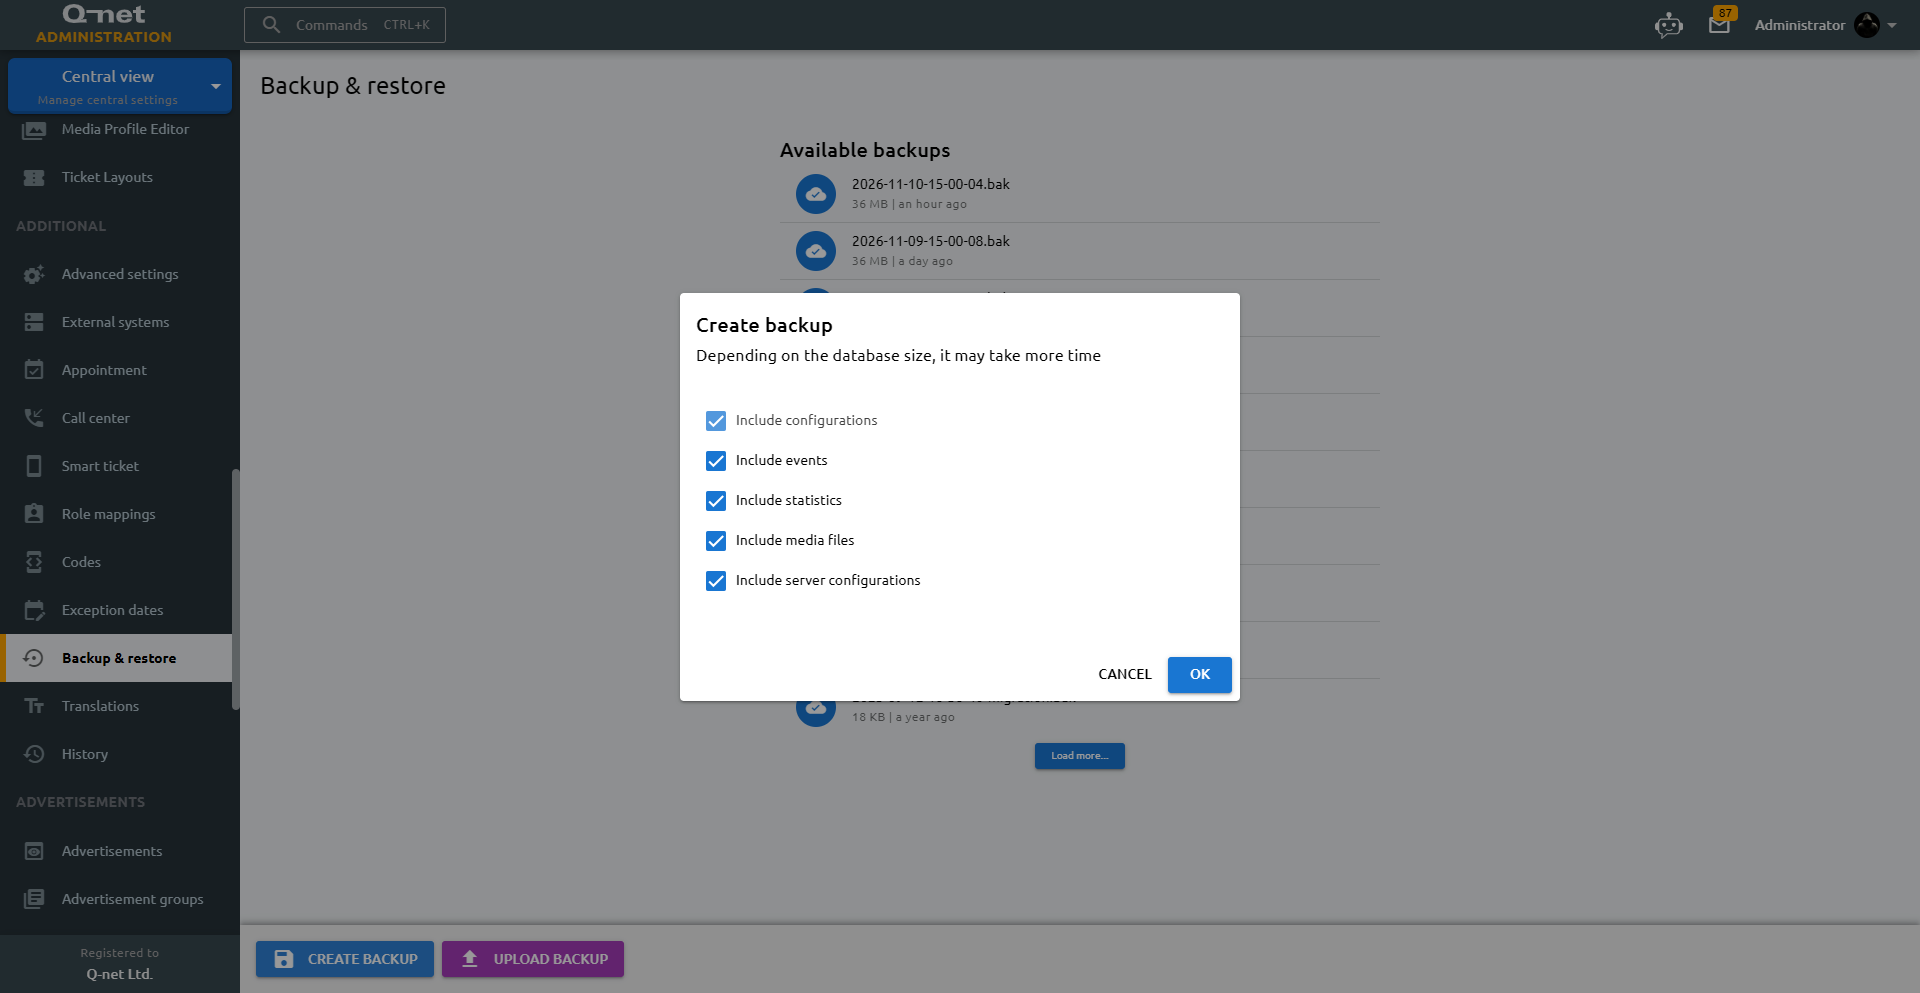
The Include server configurations option saves the files of the conf folder of the installation (e.g. application-default-*.yml and the logger settings). These files contain the server-level settings, such as ports, database and SSL settings, which are not part of the normal configuration backup. Always include them in the backup before an upgrade.
If this option is not available in your current version, stop the service and copy the whole conf folder manually to a safe place.
5. Save the backup to a safe place
The backup file is stored in the backup folder under the installation folder (e.g. c:\Program Files\Q-net\Pro 7\backup or /opt/qnet7/backup). Select the new backup in the list and click Download to save a copy to another computer or storage as well. This way the backup is available even if the server itself is damaged or the installation folder is removed.
6. Keep the current version
Keep the installer or the qnet7.jar file of the currently used version. It is necessary if you have to return to the previous version. If you replace the jar file manually, rename or move the old one instead of overwriting it.
Performing the upgrade
- Windows installer: run the installer of the new version and install it to the same folder. The installer keeps the existing data, but it regenerates the
conf\application-default-<computer name>.ymlfile based on the values entered in the installer. The previous file is saved next to it with a.bakextension; if you had added settings to it manually, check them after the upgrade. - Replacing the jar file: stop the service, replace the
qnet7.jarfile in thewebappsfolder with the new one, then start the service again.
After the upgrade
- Check the service log for errors (see Troubleshoot and maintenance).
- Log in to the administration page and check that the version number is the new one.
- Check that the devices (ticket dispensers, displays, counter terminals) are connected and working.
- Try the most important functions: issue a ticket, call it at a counter, check that it appears on the display.
If everything is working properly, keep the backup created before the upgrade for a while, until you are sure that the new version is running without problems.
Returning to the previous version
If a serious problem occurs after the upgrade and it cannot be solved quickly, you can return to the previous version:
- Install the previous version again with its installer, or stop the service and put back the old
qnet7.jarfile. - Start the service and log in to the administration page.
- Open Backup & restore, select the backup created before the upgrade and click Restore.
- Select every option in the dialog (including Include server configurations) and confirm the restore.
- Wait until the process is finished, then restart the service. The restored server configuration files take effect only after the restart.
Please report the problem to the [email protected] address with the logs and a brief description, so that it can be fixed in the next version.