Q-net V6 User authentication
- Based on account settings stored in Q-net database
- LDAP-based authentication
- Login form or Single Sign-on
Summary
For the A Q-net V6 system functionality it is important to be able to identify (authentication) the system users and provide the necessary privileges to them (authorization). The method of authentication and authorization in the Q-net V6 system can be configured on the administrative user interface. The system supports the following authentication and authorization methods (V6.0.9 or newer):
Authentication methods:
- Login form for user name and password. During the login process the user has to enter both data. The system checks with Q-net Database or LDAP registry if the user/password pair is valid.
- Windows Domain Single Sign-on (SSO). During the login process the browsers sends the authenticated username (without password) to the application server via NTLM or Negotiate protocol. In this case the server is checking the username only in the Q-net database or in LDAP registry. In case the username exists, the login will be accepted. In this authentication method the client PC and the application server must be in the same Windows Domain.
Authorization methods:
- Role assignment by database; in this case the application checks the information in its own database and sets the privileges of the authenticated user.
- LDAP-based role assignment; the system sets the role of the authenticated user by the settings of LDAP „Security Groups”.
The above methods are independent from each other; e.g. SSO is working both with LDAP and with Q-net Database authentication. The authentication and authorization methods can be configured in 6 combinations:
- Q-net V6 user authentication and authorization methods*
Because of their advantages we would highlight some methods:
- The first method is the simplest one. The application handles all users and passwords. With this method it is easy to install and maintain the application.
- The 4th and 5th methods are the simplest SSO solution. The only important thing to be take care of is that the client PC and the application server must be in the same Windows Domain and the Windows user name must match with the Q-net user name. The solution can be used with- or without LDAP server.
- The 6th method allows for Q-net users to receive various roles by LDAP policy groups.
The below document describes in details the configuration of the above 6 methods.
Method #1
Using Form, authentication and role-assignment based on Database settings
This is the default method. After the installation the system will use this method. To login the user must enter his/her username and password. After that the application will use its own database to identify the user and the user role. The user passwords stored in the database in secure (hash) format.
Configuration parameters:
To use this method the „Type of the user identification system” parameter should be set to „Full database driven…” while for the „User authentication method” parameter the „Username and password login form” option should be selected.
Method #2
Using Form, LDAP-based authentication, role-assignment by database settings
The method is similar to the previous one, the difference is, that the system checks the entered username and password with the help of the LDAP server. In this case the application doesn’t store passwords. The user roles assigned by the settings stored in the application database. The benefit of this method is, that the username and password is the same as Windows identifiers, it is enough to maintain them at one place (on LDAP server). The user IDs recorded by the application must match with the LDAP user IDs („CN” attributes); the system will connect the by this „User ID” the application users with the LDAP users.

Configuration parameters:

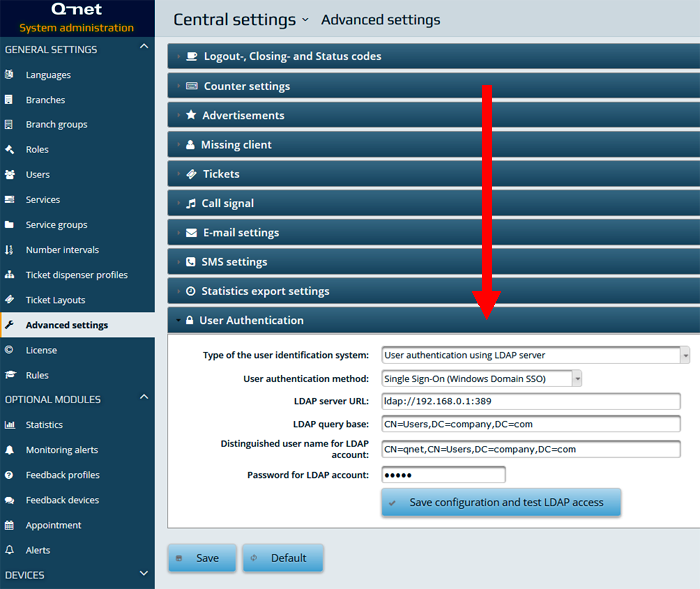
To use this method the „Type of the user identification system” parameter should be set to „User authentication using LDAP server” while for the „User authentication method” parameter the „Username and password login form” option should be selected.
Set the „LDAP server URL” (The Microsoft AD LDAP server default port is „389”), then in the „LDAP query base” and the „LDAP user query string” parameters (red frame on the above image) the „DC” parameters should be set according to the local LDAP settings.
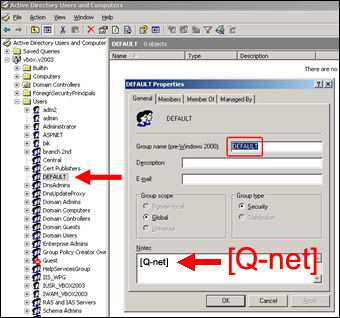
The settings for „LDAP query base” and „LDAP user query string” parameters can be copied from the LDAP manager application. The below screenshot shows the data-structure of Microsoft Active Directory LDAP server as it appears in Apache Directory Studio. After selecting the user the red frames shows the user’s „distinguishedName” parameter (in this example it is „CN=admin,CN=Users,DC=vbox,DC=v2003”). Copy the „DC” attributes from the „distinguishedName” parameter to the Q-net administration page’s „LDAP query base” and „LDAP user query string” parameters.
Save the settings, but do not leave the administrative page until the settings tested in another browser window!
In case the login is not successful in the new window, modify the settings until the user can login successfully. In case of unsuccessful settings it is better to set to the original form and database-based configuration and click on “Save”!
Method #3
Using Form, LDAP-based authentication and role-assignment
The system checks the entered username and password with the help of LDAP server. The user roles will be assigned by LDAP „Security Groups”. The benefit of the solution is, that the same usernames and passwords used, so it is enough to maintain them at one place (on the LDAP server). Furthermore the user-roles and branch assignments can be set with the help of LDAP groups. The security group handling of this method is the same as in case of method #6, it is described only in chapter 6. The user IDs recorded by the application must match with the LDAP user IDs („CN” attributes); the system will connect the by this „User ID” the application users with the LDAP users.
Configuration parameters:

To use this method the „Type of the user identification system” parameter should be set to „Authentication, branch and role assignment using LDAP server” while for the „User authentication method” parameter the „Username and password login form” option should be selected.
Set the „LDAP server URL” (The Microsoft AD LDAP server default port is „389”), then in the „LDAP query base” and the „LDAP user query string” parameters (red frame on the above image) the „DC” parameters should be set according to the local LDAP settings. (See page 12.)
The configuration of the other parameters is similar to method #6, so they are described in that chapter.
Method #4
Windows Domain SSO, authentication and role-assignment based on Database settings
This method provides SSO without LDAP. The application will use its own database to check the user ID. The advantage of the solution is, that the user can use the application quickly, (no need to enter username and password) and the configuration is simple, it is not necessary to set an LDAP server. ). The user IDs recorded by the application must match with the Windows Domain usernames; the system will connect the by this „User ID” the application users with the Domain users.

Configuration parameters:
To use this method the „Type of the user identification system” parameter should be set to „Full database driven…” while for the „User authentication method” parameter the „Single Sign-on (Windows Domain SSO)” option should be selected.
The only thing to take care is that the Windows username (e.g. MYDOMAIN\user1”) and the username stored in Q-net V6 application („user1”) should be the same. The system will not accept the login attempt of the users, whose username not exists in the Q-net v6 database.
The roles and branch accessibilities can be configured on the Q-net V6 administrative page.
Method #5
Windows Domain SSO, LDAP-based authentication, role-assignment by database settings
The system checks the entered username with the help of LDAP server. The user roles assigned by the settings stored in the application database. The advantage of the solution is, that the user can use the application quickly, (no need to enter username and password) and that the__ user-role and device settings can be configured on one interface __(in the Q-net administrative application). The LDAP Manager application used only to maintain the user passwords. The user IDs recorded by the application must match with the LDAP user IDs („CN” attributes); the system will connect the by this „User ID” the application users with the LDAP users.
Configuration parameters:
To use this method the „Type of the user identification system” parameter should be set to „User authentication using LDAP server” while for the „User authentication method” parameter the „Single Sign-on (Windows Domain SSO)” option should be selected.
Set the „LDAP server URL” then in the „LDAP query base” and the „LDAP user query string” parameters the „DC” parameters should be set according to the local LDAP settings. (See page 12.)
The system will deny the login of the user whose username not exists in the LDAP registry.
The Windows username (e.g. MYDOMAIN\user1”) and the username stored in Q-net V6 application („user1”) must be the same.
The roles and branch accessibilities can be configured on the Q-net V6 administrative page.
The 5th method should be used only in case the LDAP server and the Windows Domain controller work on different user database. In case the Windows Domain controller is using the same LDAP (AD) server, then the 4th method suggested to be used.
Method #6
Windows Domain SSO, LDAP-based authentication and role-assignment
The system checks the entered username and password with the help of LDAP server. The user roles will be assigned by LDAP „Security Groups”. The advantage of the solution is, that the user can use the application quickly, (no need to enter username and password). Furthermore the user-roles and branch assignments can be set with the help of LDAP groups. The security group handling of this method is the same as in case of method #6, it is described only in chapter 6. The user IDs recorded by the application must match with the LDAP user IDs („CN” attributes); the system will connect the by this „User ID” the application users with the LDAP users.

Configuration parameters:
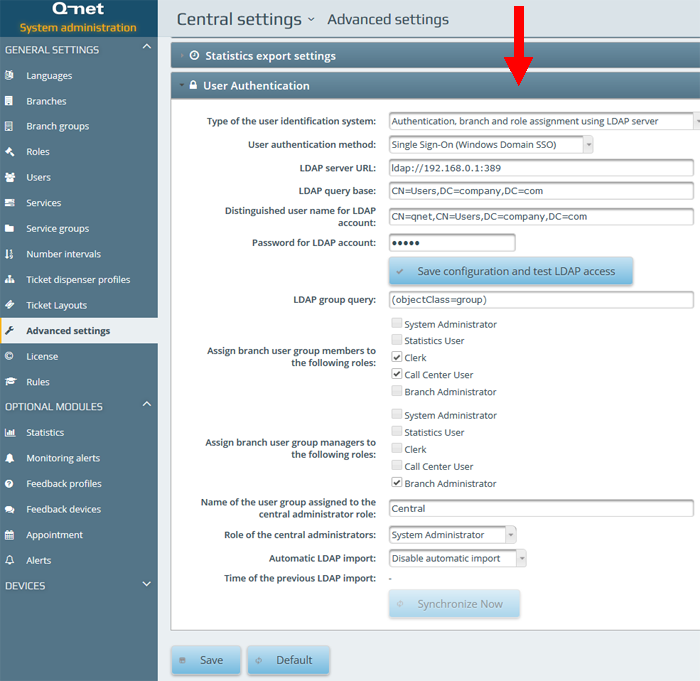
To use this method the „Type of the user identification system” parameter should be set to „Authentication, branch and role assignment using LDAP server” while for the „User authentication method” parameter the „Single Sign-on (Windows Domain SSO)” option should be selected.
Set the „LDAP server URL” (The Microsoft AD LDAP server default port is „389”), then in the „LDAP query base” and the „LDAP user query string” parameters (red frame on the above image) the „DC” parameters should be set according to the local LDAP settings. (See page 12.)
Warning: Setting the “Automatic LDAP import” option and pressing “Synchronize Now” button will overwrite the existing user and branch settings.
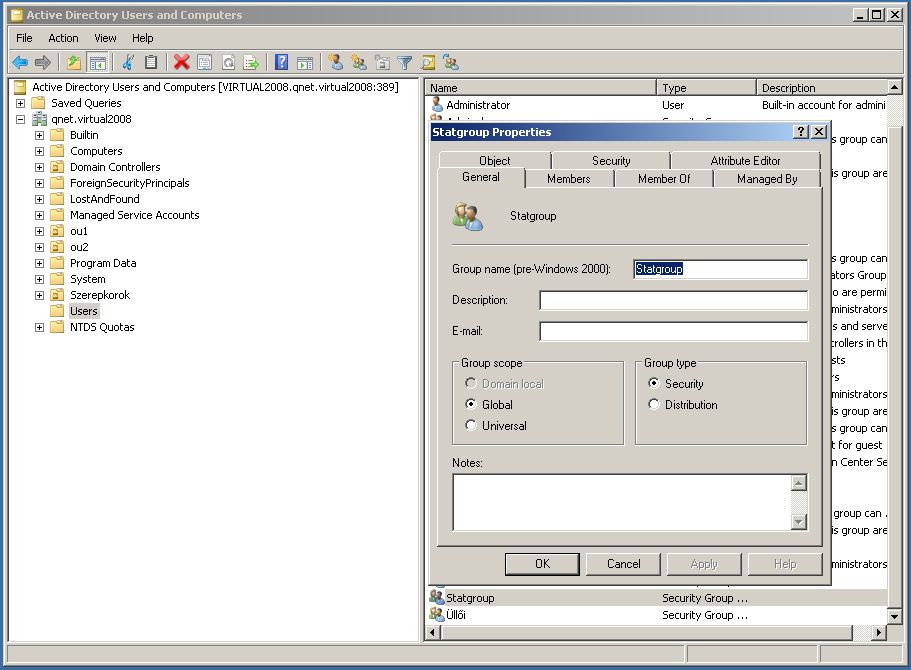
Assigning the Q-net V6 branches with the LDAP security groups
In order to assign an AD „Security Group” with a branch in the Q-net system the name of the group must be the same as the Branch ID. The application checks only those LDAP groups which includes [Q-net] in its “Notes” field.
The below screenshot shows the AD group stands for the branch named „DEFAULT”:
The same group appears as Branch on the Q-net application administrative page:
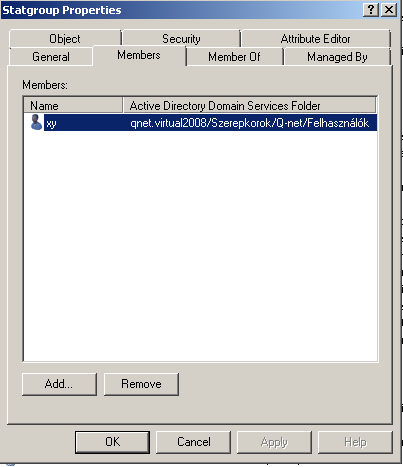
Configure the clerks of the branch
The clerks belongs to a branch can be defined with the members of the AD group:
The roles of the members can be set on the Q-net application administrative page, with the help of „Assign branch user group members to the following roles” parameter:

For one branch unlimited number of clerks can be assigned.
Configure branch administrators
The administrator of the branch can be defined with the help of the manager of the AD group („managedBy” attribute):
The roles of the branch managers can be set on the Q-net application administrative page, with the help of „Assign branch user group managers to the following roles” parameter:

One branch can have one branch-manager only. Besides this user the central administrators are allowed to modify the configuration of the branch. It is possible to configure multiple central administrators; they have access to all branches.
Creating the central administrators described in the next chapter.
Configure central administrators
For the central administrators an LDAP user group has to be created, the members of this group will receive central administrator role. This LDAP group doesn’t typify an existing branch; it can be used only to provide the central admin role. The default name of the central admin group is „Central”, which can be modified on the Q-net Administrative page. The members of this group will be the central administrators:
The name of central admin LDAP-group and the Q-net V6 user role can be modified on the Q-net Administrative page:

As the members of „Central” group will receive „System administrator” role, they will have access to the settings of every branch.
LDAP Roles
In case of the Method #6 solution you are only able to create and manage Clerk and Administrator roles through AD. With the LDAP Roles function you can manage custom roles, too.
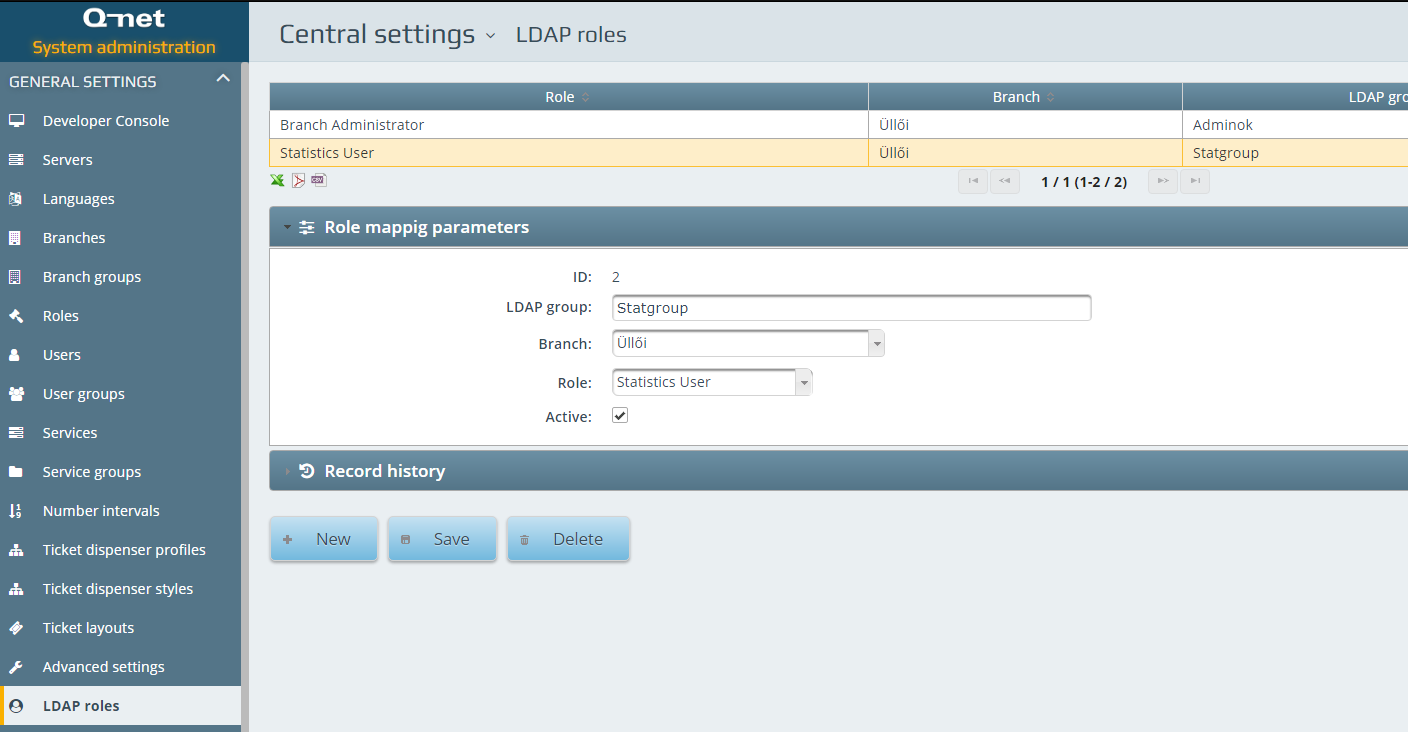
Here you can create new LDAP Roles by assigning existing User roles and apply them to a selected branch or to all branch.
On the other hand, in AD you have to create a new group with the name of the LDAP Group you previously set and fill the notes field with: [Q-net]
Adding users to this AD group will synchronize Q-net user privileges.
Enable Single Sign in Firefox browser
The Mozilla Firefox browser follows more strict security policies than Internet Explorer or Google Chrome. Because of this the not-SSL connection considered as not secure. In case of Single Sign-on the username not sent automatically, the password window appears in every case. Firefox can be forced to use SSO in this way:
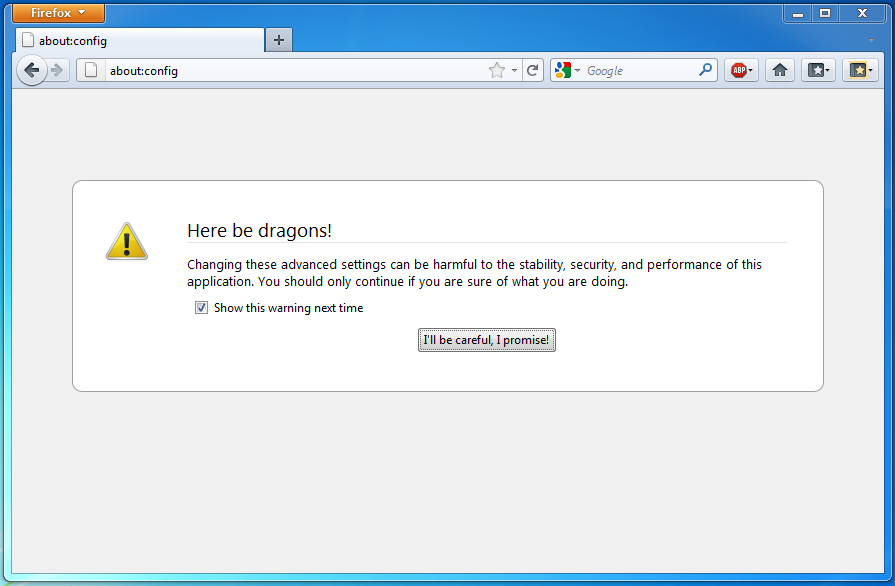
- Open Firefox and type about:config in the address bar.
- You will be prompted with a warning - click the “I’ll be careful, I promise!” button.
- Use the ‘Filter’ field to find the__ network.automatic-ntlm-auth.trusted-uris __configuration parameter
- Double-click the name of the configuration parameter
- Enter the root URL (without port number) of the application site to enable NTLM authentication for in the form: „http://myhost”.
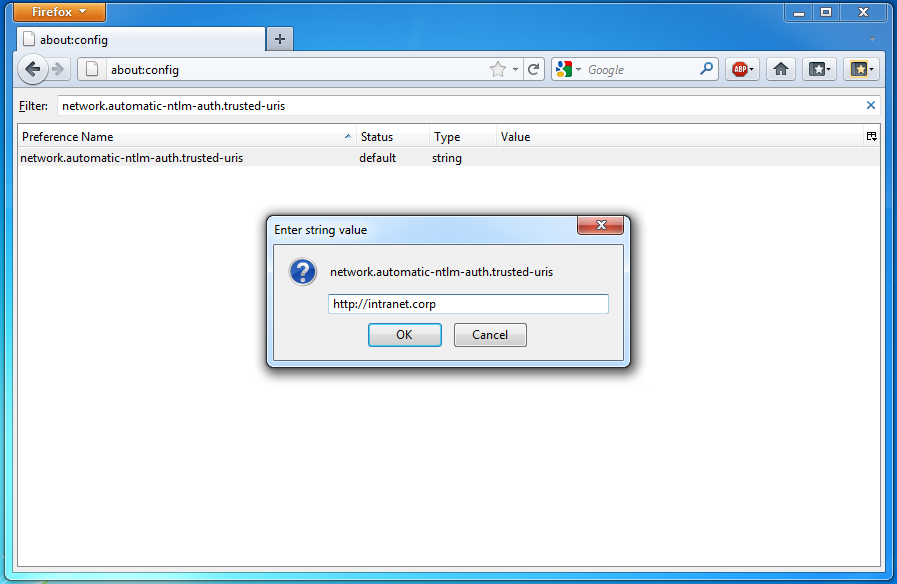
- Now, when the user opens the application website, he/she should be logged on using the Windows credentials through NTLM.