Devices - KC03
Using the keyboard
The Q-net queue management system can be used with both software- and hardware keyboard. The functionality of these keyboards is almost the same.
The administration processes can be done with the help of the above buttons:
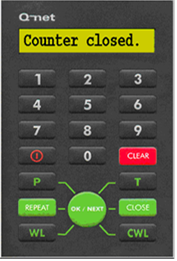
The functionality of the keyboard buttons

Login / Logout (Alarm)
 - Redirect counter
Redirect client to an other counter/clerk
 - Redirect task
Adding client to an other task
 –
– 
For typing in numerals

Deleting typed digits, answer „No”, set missing client

Repeat the last call
 - Call waiting list
Calling clients from waiting list / Right
 - Put to waiting list
Placing client to waiting list / Left

Close the client transaction

Call next client, answer „Yes” , „Enter” function
Functions
Login
Before doing any administration with the keyboard the clerk has to login into the appliance.
 Entering the login code
The clerk’s code (e.g.: 5) can be keyed in with the help of the numpad.
The clerk can also initiate an alarm by pressing the login/logout button 3 times during a transaction, the alarm can be finished, by pressing the login/logout button 3 times again.
Logout
After the clerk finished his daily work, he has to log out from the Q-net system.
The logout procedure is similar to login:
First press the below button

On the display a „Logout?” message appears
After it is confirmed with  button, in case of successful logout the „Sign on:” message appears on the display.
Please note, that the clerk cannot logout if he has unclosed client, or waiting clients on his waiting list. It is in the clerk’s interest to logout properly, otherwise his statistical data will be inaccurate which can modify the whole statistical data negatively.
Status change
The clerks can select the status during logged in time. To select the available statuses they only need to press  button during no transaction and select the status from the list. The status code can be entered by numeric keys, or press OK again and choose a code with the help of WL/CWL buttons and press OK again. The status can be cleared to become available again by pressing any key on the keypad (except numeric keys).
Calling clients
The clerk can call the next client with the help of the below button:

He can do this only, if currently there is no client with him. Nothing happens if the button pressed but an unclosed client is already there.
If the calling procedure was successful, the ticket number of the called client blink on the counter display assigned to the keyboard, and on the waiting area display, which is showing the number of the calling counter as well. The blinking takes the time period configured in the software or can be stopped by pressing the OK/Next button again. This will stop the blinking of the counter display as well.
If no client is waiting for the concrete client, by pressing the OK/Next button the message „No Tickets!” appears on the display.
The clerk can call a specific ticket number from the queue as well if s/he knows the ticket number. To do that s/he just need to press  button when there is no transaction at the counter. Than the specific ticket number can be entered with the help of the numpad.
Comment: the system will decide which customer will arrive to which clerk, by checking the configuration of clerks/counters matrix. (Which service can be handled at the particular counter by the logged in clerk) Based on this information it appears exactly which services can be executed. The customer who arrived first, and chose one of the tasks which can be handled, will be transferred to the particular counter.
Repeat the last call
If the customer doesn’t arrive for the first call, repeat the call by pressing the
 button.
This will repeat the calling procedure, the counter display and the waiting areas starts blinking again with the ticket and counter number, and if the voice call or a call signal enabled, it will be played again.
Close the client
When the execution of the service of the called client finished, and no more administration is necessary, then it must be closed. This can be done by pressing the
 button.
Set missing client
When the customer didn’t arrive for the first call, the clerk can repeat it to warn the client. If he still doesn’t arrive, the teller can mark him as a “missing client”. Depending the relevant settings of the system, the software will put it back to the list of the waiting clients after a pre-adjusted time. With the help of this solution the client still have a chance not to loose his position in the queue even if he missed his calls. (E.g. he was out at the toilet). If he doesn’t arrive after all trial, his number will appear in the statistics as missing client – meaning, no administration happened to this client.
To set a missing client the  button should be pushed while the ticket number is visible on the display.
Placing client to waiting list
This function is useful, when the execution of the client’s task should be interrupted for a while, as it requires some background work. Then the client can be placed to a waiting list, and later (when the background work finished) can be called again. The below button is for placing the customer to waiting list:

 By pressing the „OK” button it can be chosen from a list which waiting list should be used. By pressing the Left – Right buttons you can choose:
  or
or  .
.
You press Enter / OK to confirm the selection:
A Local Waitlist is connected to a Clerk, while the Global Waitlist is for the whole Branch.
From the counter display the ticket number will disappear, just like when it closed, and the number of clients on the waiting list will be increased with one.
Selecting clients from waiting list
If we have placed client to the waiting list, we can call them by following the next steps:
By pressing the  button
Press the „OK” to select the waiting list of the client
By pressing the  or
or  buttons you scroll to right or left.
pressing the „OK”.
Redirect client to an other task
It is necessary to redirect a client if he chose wrongly his task on the ticket dispenser. By pressing the  button, the message
„Choose: 0” appears on the screen.
By using the numpad we can type in the numeral of the required task. (The system administrator or the branch manager should provide a list of the tasks and their IDs. On the displays the same situation will occur than in case of closing the customer. The client will be called by a clerk/counter who can arrange this selected task. The dedicated task can be entered on the numpad as well if the ID is known.
Redirect client to an other counter / clerk
With this command we can forward the customer directly to an other counter. After pressing the  button, the
„Choose: 0” message appears.
By using the “OK” we have to select the counter or clerk. The redirect command should be confirmed with selecting the correct option. The available counters and clerks will be in the list of selection. On the displays the same situation will occur then in case of closing the customer.
The dedicated clerk / counter can be entered on the numpad as well if the ID is known.
Error messages
During the using of the calling unit, some error messages might appear on its display. These messages are describing precisely the type of the error, and these errors can be remedied easily.